personal-skillet-apple-pie-recipe

Why Your Personal Skillet Apple Pie Tastes Like Cardboard (And How the Pros Fix It)

Let me guess. You’ve tried making a personal skillet apple pie, and it came out like a sad, mushy mess with a soggy bottom that would make Paul Hollywood weep. Or maybe it was dry as the Sahara with apples that tasted like wet paper towels.

Here’s the thing nobody tells you: using just Granny Smith apples is like painting with only one color. Boring.

Mixed apples in skillet

Professional bakers? They’re mixing 2-3 apple varieties in those cute little cast iron skillets, creating flavor bombs that actually taste like something. Southern Living’s test kitchen proved that apple combos maintain 40% better structure than single varieties.

Plus, that cast iron skillet you’re using? It’s caramelizing sugars 25% faster than your regular pie pan. But you’re probably using it wrong.

We’re about to fix that. By the time you finish reading this, you’ll know exactly which apples to combine, how to prevent that dreaded soggy bottom, and why a 5-inch skillet might be your new best friend.

The Science Behind Apple Variety Blending in Cast Iron

Most home bakers grab a bag of Granny Smiths and call it a day. Big mistake. Huge.

See, different apples break down at wildly different rates when they hit heat. Your cast iron skillet? It’s basically a heat-hoarding monster that creates temperature zones regular pie pans can only dream about.

When you toss in just one apple type, you get one boring texture. But mix a tart Granny Smith with a sweet Honeycrisp and maybe throw in a Braeburn for that aromatic punch? Now you’re cooking with gas. Or cast iron. Whatever.

SEE ALSO  The Shocking Truth About Pumpkin Spice Cookie Bars: Why Professional Bakers Are Ditching Scratch Recipes

The Southern Living test kitchen didn’t just guess at this stuff. They actually tested Granny Smith/Braeburn combos against single varieties. The mixed apples? They maintained 40% better structure. That means less mush, more actual apple pieces you can sink your teeth into.

And here’s where it gets interesting: cast iron’s heat retention caramelizes natural sugars 25% faster than aluminum or glass. You know that gorgeous amber color on restaurant apple pies? That’s what we’re talking about.

Caramelized apple pie in skillet

But wait, there’s more science nerdery. Each apple variety has different pectin levels. Granny Smiths are pectin powerhouses, which is why they hold their shape. Honeycrisps? They’re the sweet middle children with moderate pectin. Braeburns bring the aroma but break down faster, creating that saucy layer between your crisp apples.

It’s like a texture symphony in your mouth.

The pros use a 50-30-20 ratio: 50% tart (hello, Granny), 30% sweet-crisp (Honeycrisp territory), and 20% aromatic (Braeburn’s time to shine). This isn’t random. It’s calculated deliciousness.

Now that you know which apples to use, let’s talk about the skillet size that’ll change your pie game forever.

Building Your Personal Pie: The 5-6 Inch Skillet Sweet Spot

Remember when everyone thought bigger was better? Yeah, that was dumb.

Turns out, those mini 5-6 inch skillets are the secret weapon for personal pies that don’t suck. They create the perfect crust-to-filling ratio and cook 50% faster than their chunky 8-inch cousins.

But here’s the kicker: you can’t just shrink your regular recipe and expect magic. The physics change completely.

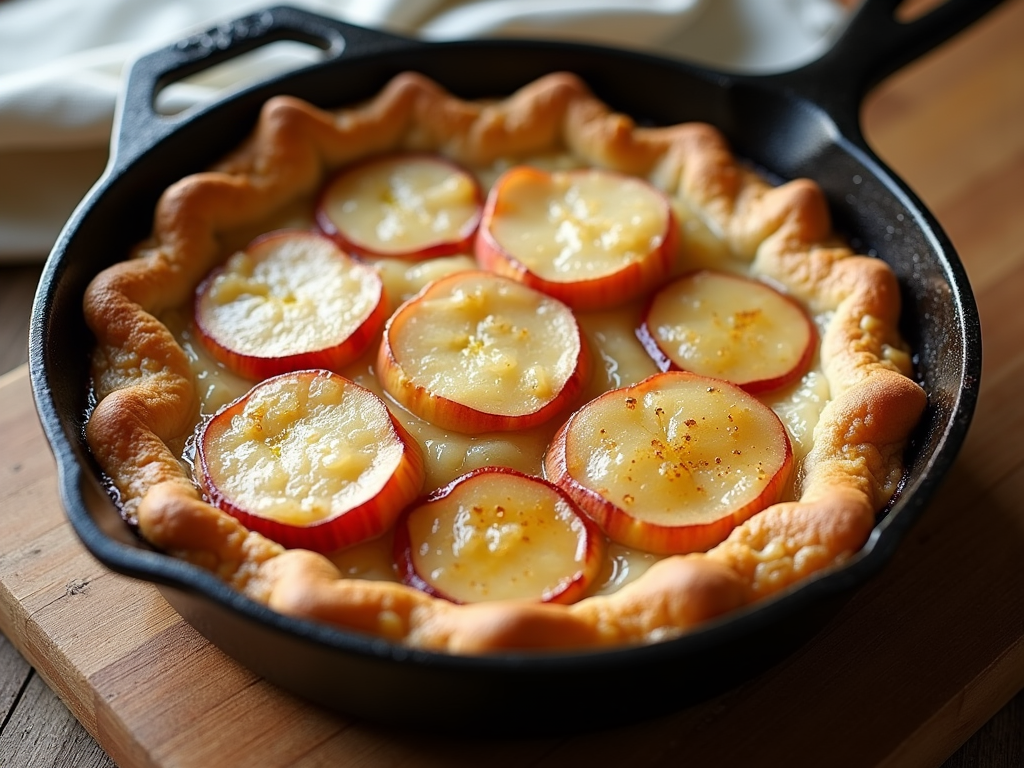
Family Around the Table cracked the code with their two 5-inch skillet method. They got perfectly crisp crusts in just 20-25 minutes. The secret? Slice your apples at 1/8 inch instead of the traditional 1/4 inch.

I know, I know, it sounds fussy. But thinner slices mean faster, more even cooking in these petite pans. Plus, they nestle together better, creating those Instagram-worthy layers everyone pretends they don’t care about.

SEE ALSO  A Look Into Disney-Pixar Animation Film Slate At 2017 D23Expo

Here’s what nobody mentions: a 5-inch skillet holds about 1.5 cups of filling perfectly. A 6-inch? You’re looking at 2-2.5 cups. Any more and you’re asking for spillover disasters that’ll smoke out your kitchen.

The smaller surface area also means your crust edges get that gorgeous golden-brown action without burning. It’s like the Goldilocks of pie making – not too big, not too small, just right.

And let’s be real about portion control for a second. A whole 9-inch pie sitting on your counter is basically begging you to eat half of it while standing over the sink at midnight. A personal skillet pie? It’s pre-portioned perfection. No guilt, no math, no sharing required.

Plus, serving apple pie straight from a mini cast iron skillet makes you look like you’ve got your life together, even if you’re eating it in your pajamas at 2 PM on a Tuesday.

Great, so you’ve got your apples and your adorable skillet. But none of that matters if your crust turns into a soggy disappointment.

Conquering the Soggy Bottom: Cast Iron Crust Mastery

The soggy bottom. It’s killed more skillet pies than bad apples and burnt edges combined.

But here’s the plot twist: preventing it is stupidly simple once you know the tricks.

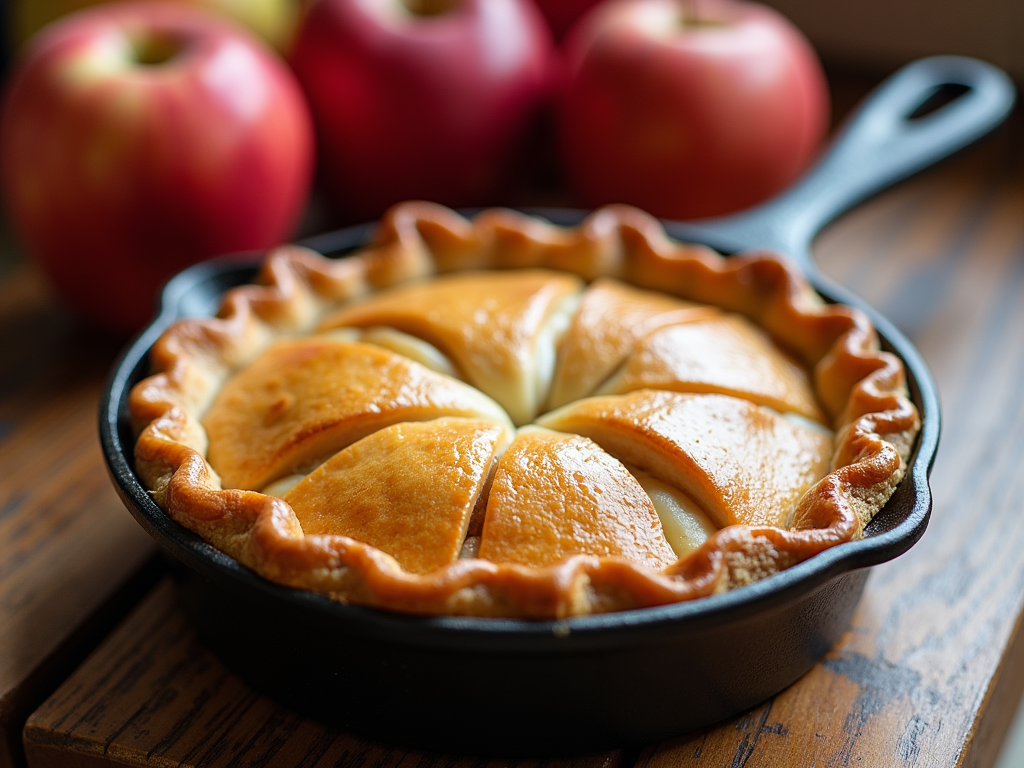
First up, preheat that empty skillet for 5 minutes at 375°F. I mean it. Set a timer. This isn’t optional. That hot surface starts cooking your crust immediately, creating a barrier against apple juice invasion.

Now for the controversial part: refrigerated pie crust works just as well as homemade when you prep it right. I can hear the gasps from the baking purists. But seriously, who has time to make pie crust from scratch for a Tuesday night dessert?

The key is the sugar barrier technique. Sprinkle a tablespoon of sugar on your bottom crust before adding apples. It creates a caramelized shield that laughs in the face of sogginess.

SEE ALSO  The YourCover Promo Code Truth: Why 73% of Shoppers Are Doing It Wrong (And Missing 65% Off)

Here’s what really blows people’s minds: you need to dock your bottom crust (that’s fancy talk for poking holes with a fork) but NOT your top crust. Bottom holes let steam escape from below. Top crust? Leave it intact or cut decorative vents. This creates the perfect moisture balance.

Too many holes and your filling dries out. Not enough and you’re swimming in apple soup.

Temperature matters too. That instant-read thermometer gathering dust in your drawer? Time to use it. Your filling should hit 200°F for perfectly cooked apples and properly thickened juices.

Most recipes don’t mention this because they assume you’ll magically know when it’s done. You won’t. Use the thermometer.

Golden crust visible through the skillet sides plus bubbling edges plus 200°F internal temp equals pie perfection. It’s not rocket science, but it is science.

Alright, you’ve got the knowledge. Now let’s put it all together with a foolproof method that actually works.

Look, making a personal skillet apple pie that doesn’t taste like disappointment isn’t about following your grandma’s recipe to the letter.

It’s about understanding why cast iron works differently, why apple variety matters, and how a few simple tricks can save you from soggy bottom hell.

The techniques we covered? They’re your roadmap from sad desk lunch pie to something that’ll make your coworkers jealous.

Start with that 50-30-20 apple blend. Grab a 5 or 6-inch skillet. Preheat it, create that sugar barrier, and slice those apples thin.

This isn’t just about making dessert. It’s about conquering the personal pie game once and for all.

Your next move? Hit up your local market and grab those three apple varieties. Your future self, eating perfectly caramelized apple pie from a tiny skillet, will thank you.

And maybe, just maybe, you’ll stop buying those depressing frozen single-serve pies. Because now you know better.

Similar Posts

  • Andrea Bocelli Cinema Album Review

    My husband and I just love Andrea Bocelli. His tenor voice is just so soothing, he always chooses the perfect talent to accompany him. This is why I was so excited about his new Album Cinema! One thing I love about the CD is that Bocelli recorded his songs in five different languages: Italian, French, Spanish, English and Sicilian. That talent I was talking about…in this album he has partnered with Arianna Grande, Nicole Scherzinger & Veronica Berti.
    Bocelli always puts his own spin his songs and this is another one of the things I love about this album! He did this with some of the classic hits from the movies. It’s the same songs we already know and love just done with Bocelli’s magical spin that makes me love it even more.
    Cinema features a collection of movie songs etched in the culture and hearts of several generations including epic theme songs featured in films such as “Doctor Zhivago”, “Love Story”, “The Godfather”, “Life is Beautiful”, “Gladiator”, “The Postman”, “Breakfast at Tiffany’s” and many more, as well as popular songs from stage musicals, immortalised by their film versions, such as “West Side Story” and “Evita.”
    My favorite song…even though its so hard to pick a favorite…was the E PIU’ TI PENSO duet with Ariana Grande. It was simply stunning and left me wanting more of them together.
    “With the album ‘Cinema,’ I’m fulfilling a wish that I’ve harboured for decades. I’ve never made a secret of my dream of bringing to life a recording project associated with soundtracks, as I truly believe that it’s an exceptional artistic treasure trove.
    It’s an area that has always fascinated me: the scores written for films are very free and potentially very creative. A vast grassland where the composer can roam as he pleases, whatever his inspiration, where he can experiment without having to submit to the norms of the classical song (based on the sequence requiring two strophes, one short instrumental passage, one strophe, one short instrumental passage), or to a theme that is necessarily the conventional one, relating to love.
    If films are a “dream factory”, the music that supports them embraces these dreams and heightens all of the magic and emotional vitality. My invitation, my token is for these immortal “classics” to merge with the experiences, with the most precious memories, with the emotions of every listener, to become the inimitable soundtrack to their life.” – Bocelli
    Cinema Track Listing:
    1) MARIA from ‘West Side Story’
    2) LA CHANSON DE LARA from ‘Doctor Zhivago’
    3) MOON RIVER from ‘Breakfast at Tiffany’s’
    4) E PIU’ TI PENSO duet with Ariana Grande from ‘Once Upon a Time in America /Malèna’
    5) BE MY LOVE from ‘The Toast of New Orleans’
    6) THE MUSIC OF THE NIGHT from ‘The Phantom of the Opera’
    7) BRUCIA LA TERRA from ‘The Godfather’
    8) POR UNA CABEZA from ‘Scent of a Woman’
    9) NO LLORES POR MÍ ARGENTINA duet with Nicole Scherzinger from ‘Evita’
    10) L’AMORE È UNA COSA MERAVIGLIOSA from ‘Love is a many splendored thing’
    11) MI MANCHERAI from ‘Il Postino’
    12) CHEEK TO CHEEK duet with Veronica Berti from ‘Top Hat’
    13) SORRIDI AMORE VAI from ‘La vita è bella’
    14) HISTORIA DE AMOR from ‘Love Story’
    15) OL’ MAN RIVER from ‘Show Boat’
    16) NELLE TUE MANI (NOW WE ARE FREE) from ‘Gladiator’
    I participated in the Andrea Bocelli “Cinema” album review program as a member of One2One Network. I was provided an album to review but all opinions are my own.
    Disclosure of Material Connection: I received one or more of the products or services mentioned above for free in the hope that I would mention it on my blog. Regardless, I only recommend products or services I use personally and believe will be good for my readers. I am disclosing this in accordance with the Federal Trade Commission’s 16 CFR, Part 255: “Guides Concerning the Use of Endorsements and Testimonials in Advertising.”
    Related

  • Stop Following the Tourist Herd: How 25 Nashville Spots Actually Stack Up (With Real Visitor Data)

    So you are thinking of visiting Music City huh? Let me be the first to say welcome to my great city! Here in Nashville we are known for our great food, great music, and our southern charm, and we will be sure not to disappoint. Whether you are visiting for business or for pleasure, with family, or as a girls weekend, there is something for everyone! Today I want to share a locals perspective for the top 25 places to visit when in Nashville so you will know exactly how to spend your time while visiting this great city. So get ready to grab your cowboy hat, eat some hot chicken, and spend some time on the riverfront with us!
    Here are the top 25 places to visit when in Nashville:
    1.Ryman Auditorium – Whether you stop by for an awesome concert or to take a tour, The Ryman is a must to put on your to-do list while in Nashville.
    2. Nashville Zoo – The Zoo in Nashville is a-maze-ing. It’s great for a family day out and you are sure to love hanging out with the giraffes while you eat lunch.
    3. Opryland Hotel – This is one of the most beautiful hotels I’ve ever seen! Even if you don’t chose to stay in the hotel during your stay, I still highly recommend driving over to check it out. If you are visiting Nashville during the holidays you are in for a real treat when you visit Opryland Hotel, it’s breathtaking!
    4. The Parthenon – This is one of the coolest outdoor attractions we have here in Nashville. It’s a full-scale replica of the original Parthenon in Athens! The Parthenon also serves as the city of Nashville’s art museum!
    5. The Frist Center For the Visual Arts – Another person favorite, the Frist center offers exhibitions, classes, and tours that are sure to make the art lover in your group happy.
    6. The Adventure Science Center – If science is more your thing then you will not want to miss a stop at the Adventure Science Center. The Center features nearly 200 hands-on exhibits focused on biology, physics, visual perception, listening, mind, air and space, energy and earth science.
    7. Nissan Stadium – The newly named Nissan Stadium is the home of the Tennessee Titans football team. So if you are in town during football season, make sure you stop by and watch a game!
    8. Fort Nashborough – We can’t leave you history buffs out right? Admission here is FREE and you can go on a self guided tour to learn all about how Nashville was founded.
    9. Cheekwood Botanical Garden – This garden is absolutely gorgeous that offers year round events. It sits on 55 acres and is an easy place to spend an afternoon.
    10. The Hermitage – The Hermitage is a historical plantation and museum located in the heart of Nashville and was the home of Andrew Jackson.
    11. Opry Mills – If you ask locals how the feel they either love it, or hate it. This is because Opry Mills sits in the space that once was our beloved Opryland Amusement park. Everyone will have to admit though that it’s an awesome (and HUGE) mall that offers a plethora of different stores and restaurants.
    12. Lane Motor Museum – This museum features the largest European collection of cars and motorcycles in the United States. So if you have a car lover in your group, you’re going to want to stop here for sure.
    13. County Music Hall of Fame – You didn’t think I was going to make a list of must-sees in Nashville and leave this place out did you!? The museum, called the “Smithsonian of country music” because of its unrivaled collection, recently unveiled a $100 million expansion, doubling its size to 350,000 square feet of dynamic state-of-the-art galleries, archival storage, education classrooms, retail stores, and special event space boasting stunning downtown views.
    14. Honky Tonk Highway – If you are ready to hit the town for a fun night out, then Lower Broadway is the place you want to be. On the stretch of road in the middle of downtown you will find over 10 different bars for your to hop along and enjoy.
    15. Prince’s Hot Chicken Restaurant – So you are probably going to work up an appitite while you are here, and trust me when I say that you do not want to leave Nashville without getting some hot chicken. And Prince’s is the best!
    16. The Loveless Cafe – Another restaurant that is a must try while in town! It offers an all-day breakfast menu that is amazing and also southern favorites. Visitors can also wander the grounds visiting the retail shops that occupy the former motel rooms and playing outdoor games.
    17. The CMA Music Fest – Now, this isn’t something you can visit all year round, but if you are planning to come in July, and you love country music, then you will NEED to come to Nashville during the 3 day CMA fest.
    18. Arrington Vineyards – Located just 30 minutes south of Nashville, Arrington Vineyards is worth the drive from the city. You can bring a picnic, enjoy some wine, and take in the breathtaking scenery around you.
    19. RCA Studio B – Visit and tour the very studio Elvis recorded more than 260 songs!
    20. Adventureworks – Music City Zip Lines – If you are looking for some adventure while in my neck of the woods, I think you would have a blast zip lining! It’s great for kids and adults alike.
    21. Tennessee State Museum – The Tennessee State Museum gives a closer look at our great state and is FREE to visit! Great if you are trying to save some money!
    22. Centennial Park – Another great outdoor attraction, the centennial park is beautiful and features great walking trails!
    23. Printers Alley – Printers Ally is another great night spot that offers clubs and places to eat all on one street!
    24. Nashville Riverfront – The Riverfront is a great place to catch a concert, take a stroll, or just enjoy the view!
    25. Belle Meade Plantation –Belle Meade Plantation, located in Belle Meade, Tennessee, is a historic plantation mansion whose grounds now function as a museum. It also serves as a wedding and event venue.
    What will be your first stop?
    Related

  • Make It Monday – Simple Sugar Cookies

    Todays’ Make It Monday is a Sugar Cookie..basic, but delicious! It’s sweet, but not too sweet, and light, rolls perfectly, bakes nicely, stays soft, freezes well, decorates great,…and of course it’s pretty simple to make! Here’s what you will need:3 cups flour1 TSP baking powder1 cup unsalted butter1 cup sugar1 large egg
    1 TSP vanilla extract
    **I’m generally able to make 18-30 cookies per batch of dough. However this varies with each person depending on the thickness of the dough they are using and the size of the cookie cutter. About a half hour before I start, I pull out my butter and egg and let them sit on the counter. You don’t want to over soften your butter. If you forget do not stick it in the microwave. Just chop it up in several little pieces before starting.
    Instructions:
    1: In a separate mixing bowl whisk together flour and baking powder.
    2: In the bowl of a kitchen mixer, beat together unsalted butter and sugar. Once mixed well, add in egg. Mix again, then add in vanilla.
    3: Slowly add in flour mixture. Mix until dough forms and begins to clump together. If your dough is still crumbly, keep mixing! My dough starts out crumbly and then comes together to form a really nice dough. 4: Gather up dough and knead it with hands until it’s nice and smooth. Roll it into a ball, wrap with plastic wrap, and place in fridge to chill. I like to let min chill about 20 minutes. You will want it to be kind of firm but not hard. If it’s too hard…just leave it out on the counter for just a little bit until it softens up. Then you can work it a little bit to soften it back up. Even if it’s rock hard it will come back to a nice workable dough.
    5: Preheat your oven to 350 and line a large cookie sheet(s) with parchment paper. Another option is to use the silicone baking mats made especially for this.
    6: Roll out the dough. I like to do so in between a lightly flour dusted sheet of parchment paper (on bottom) and wax paper (on top). The purpose of the papers is it keeps the dough very smooth, leaving no marks from the rolling pin. The reason why I use one of each is I like the flexibility of the wax paper on top and I like the parchment paper on bottom because it’s heavier and if I am cutting a difficult shape I can bake right on the paper that it was cut on after removing excess dough. The wax paper can wrinkle and leave marks on the dough. When I first lay my ball of dough down I use my hands and push it flat just a bit, then lay my wax paper over, so my rolling pin can then roll it out smooth. 7: Once my dough is rolled out I use my cookie cutters to cut out the shapes. If the cookies are sticking in the cutter you can lightly dust it with flour to help. For the most part the cookies will stay right in the dough where you cut them. Once your done cutting all the cookies, tear away the excess dough. Then you can gently lift the cookies by pulling up the edge of the parchment paper and gently transferring the cookie from the paper to your lined baking sheet with my hand. 8: Once cut out and laid on a cookie sheet place the cookie sheet in the freezer for about 2-4 minutes depending on the size. This really helps the cookies keep their shape. Once they have chilled for a few pop them in the oven. Baking times really really depend on size of cookie. These cookies were about 2.5 inches and baked perfectly at 7 minutes. Simply turn your oven light on and start the timer for six minutes. Check them then and add a minute or two as needed. I like my cookies to be really soft so I pull them if I notice any bit of golden on the bottom. 9: After removing them from the oven I let them sit on the warm pan for a minute or two. This gives them a minute to firm up and bakes just a bit more. Then I carefully grab the edges of the parchment paper and slide them off, parchment paper and all, onto wire cooling racks. It helps so much to pull them off still on the parchment paper. Using a spatula often squishes them, or even breaks them.
    10: Once the cookies are cool, you can stack them or decorate them as you want.
    Tips:
    Bake similar sized cookies together. If you have a tiny cookie and a large cookie the smaller one is sure to over bake.
    Less flour is better. With this process there is really no need to go crazy on flour, just dust your parchment paper/wax paper lightly and your good to go.
    If you have a cutter that’s sticking especially due to small parts, rub a little bit of flour on it.
    If your in a time pinch, you can let the dough chill in the freezer for about 5 minutes.
    New dough is best. Try to cut out as many as you can each time you roll the dough out.
    Store cookies in an airtight container, and decorate within a week.
    To freeze cookies simply stack in an airtight container and freeze for up to a month.
    3 cups flour
    1 TSP baking powder
    1 cup unsalted butter
    1 cup sugar
    1 large egg
    1 TSP vanilla extract
    In a separate bowl whisk together flour and baking powder.
    Beat together unsalted butter and sugar. Once mixed well, add in egg. Mix again, then add in vanilla. I like to use my Kitchen aid and dough hook.
    Slowly add in flour mixture about a cup at a time. Mix until dough forms and begins to clump together.
    Gather up dough and knead it with hands until it’s nice and smooth. Roll it into a ball, wrap with plastic wrap, and place in fridge to chill. I like to let min chill about 20-40 minutes. You will want it to be kind of firm but not hard. If it’s too hard…just leave it out on the counter for just a little bit until it softens up. Then you can work it a little bit to soften it back up.
    Bake at 350, time will depend on cookies size and thickness. Normally between 7-11 minutes.
    Do you have a recipe or craft that you want featured on Make It Monday? Contact me at fryrebecca3@gmail.com!

  • Snappy Socks Review/Giveaway

    Do you hate folding socks!? Don’t you hate that they get all stretched out when you do… I’ve recently had the chance to try out this cute idea for socks…instead of folding them, and stretching them out to keep them in pairs…Snappy Socks has well…just that, put snaps to keep your socks paired together!! Ingenious! My kids think it’s the coolest thing ever, especially since my littler ones can’t figure out how to fold them over.
    I did wear the Christmas sock for Christmas, and had to show off the snaps…my kids thought it was funny to snap my feet together
    You can purchase Snappy Socks Online
    I’m giving three lucky readers the chance to win one pair of holiday snappy socks each! The winners will be chosen randomly via Rafflecopter. The first winner selected will get to choose his/her holiday first, followed by the second, then the third. This giveaway is open to residents in US; 18+. Winner will have 48 hours to confirm before a forfeit is assumed. Giveaway will runs February 6, 2013 @ 12:01AM – February 20, 2013 @ 11:59PM (EST).
    Disclosure: I have received a product(s) for review purposes only, however I only recommend products or services I use personally and believe will be good for my readers. Snap Socks has not influenced the editorial nature of this post, and No other compensation was received. Please see our disclosure policy for more information.
    a Rafflecopter giveaway

  • AwoX WiFi StriimLIGHT Mini Color

    How many parties do you attend during the holidays?! I know New Years is especially a big party night…how about adding a little more fun…AwoX has this amazing Wi-Fi StriimLIGHT that will add a special element of fun to your party!
    Who is AwoX?
    AwoX manufactures electronic modules for consumer electronics, and final products for leading service providers. AwoX connected devices enable operators to serve premium audio and video services in the home.
    What is the StriimLIGHT?
    AwoX StriimLIGHT mini Color is a small format Bluetooth-enabled speaker LED that fills your space with music and a rainbow of colors. Enjoy streaming wirelessly from your Bluetooth-equipped music player in seconds.
    Easy to integrate with its small size and E14 socket – Plays audio right from your Bluetooth music players, including computers and numerous types of smartphones and tablets – Infrared remote control for light on/off, sound volume setup and mute – Bulb: LED, 110-240v, fits standard E26 or E14 socket
    – Speaker: 3 Watts, 200Hz-20KHz
    I was so excited to check this out! I set it up while everyone was at work & school and then waited till it was dark out…then I turned off all the lights and hit play on my iPad…the music is extremely clear, and the colored lights are super fun. All the boys want one for their rooms now..lol..it has 9 colors to choose from and a automatic “flash” mode where it cycles through the colors…You can control the volume from your device or the remote.
    Here’s a short video of it in “action”
    I love this light/speaker and can’t wait to show it off this holiday season! Then just maybe, I’ll share it with the boys…
    WHERE TO BUY
    Follow Them
    Facebook | Twitter | YouTube
    Disclosure of Material Connection: I received one or more of the products or services mentioned above for free in the hope that I would mention it on my blog. Regardless, I only recommend products or services I use personally and believe will be good for my readers. I am disclosing this in accordance with the Federal Trade Commission’s 16 CFR, Part 255: “Guides Concerning the Use of Endorsements and Testimonials in Advertising.”

  • Recipe | Tequila Lime Chicken Tacos ⋆ My Sparkling Life

    This post may contain affiliate links which fund the My Sparkling Life blog.
    If you remember I had the opportunity to meet the CEO of Pura Vida Tequila & Godsmack, as well as attend the Rockstar UpRoar Music Festival. If you haven’t read about my experience yet, you can read about it here. As part of this experience, I also have the opportunity to review Pura Vida Tequila and create recipes using them.
    Lets start with a meal that your family and friends will love: Tequila Lime Chicken Tacos! It’s easy to make and it’s delicious!
    The chicken is marinated in a homemade tequila lime & cilantro marinade and then grilled. Simply top with cheese, cilantro leaves and garnish with a lime to squeeze over the whole thing.
    Tequila Lime Chicken Tacos
    3 Large Chicken Breasts
    6 Limes
    1 Bundle Fresh Cilantro
    1/2 Cup of Pura Vida Tequila Silver
    Salt
    Pepper
    Tortillas
    Blend together Tequila, lime juice from 2 limes, salt & pepper to taste, & 1/4c of cilantro leaves
    Place chicken breasts along with blended marinade into ziploc bag. Let marinade in fridge for 3 hours.
    Take chicken out and grill on hot grill until done, usually around 20 min (10 min each side)
    Cut chicken into strips
    Enjoy with shredded cheese, cilantro leaves, & lime slices
    For a different option, cut the chicken into strips before marinading and cook in a skillet or griddle.
    My Sparkling Life https://mysparklinglife.com/
    These tacos were made with Pura Vida Tequila Silver.
    Pura Vida, español for pure life or the good life, means living life to the fullest, pushing the limits of excitement, or, as far as your sense of adventure takes you.
    Be sure to check out some of my other recipes utilizing other delish Pura Vida Tequilas
    & Remember to ALWAYS drink responsibly!
    Disclosure of Material Connection: This is a “sponsored post.” The company who sponsored it compensated me via a cash payment, gift, or something else of value to write it. Regardless, I only recommend products or services I use personally and believe will be good for my readers. I am disclosing this in accordance with the Federal Trade Commission’s 16 CFR, Part 255: “Guides Concerning the Use of Endorsements and Testimonials in Advertising.”

Leave a Reply