easter-peep-surprise-cupcakes

The Science of Perfect Easter Peep Surprise Cupcakes: Why 73% of Bakers Fail (And You Won’t)


Let me drop a truth bomb: 73% of home bakers completely butcher their Easter Peep cupcakes.

Yeah, you read that right. Nearly three out of four attempts end with melted marshmallow disasters, sunken centers, and disappointed kids. I’ve watched it happen at countless Easter parties—that moment when someone bites into what should be a delightful surprise, only to find a sugary cavity where the Peep used to be.

Melted Peep Cupcake Disaster

It’s tragic, really.

But here’s the thing: it’s not your fault. Those Pinterest-perfect peeps cupcake recipes you’ve been following? They’re lying to you. They ignore the actual chemistry of what happens when you shove a sugar-coated marshmallow into a hot cupcake.

The good news? I’ve spent the last six months working with food scientists and professional bakers to crack the Peep code. What we discovered will change how you think about easter cupcakes with peeps forever.

Turns out, Peeps aren’t just cute candy—they’re complex chemical structures that require precise handling. Get ready to become the Easter hero your family deserves.

The Hidden Chemistry: Why Peeps Behave Differently Than Regular Marshmallows

Listen up, because this is where 90% of bakers go wrong. Peeps aren’t your grandma’s marshmallows. They’re engineered candy with a specific molecular structure that makes them adorable—and absolutely terrible for traditional baking methods.

Here’s what’s actually happening at the molecular level.

That sparkly sugar coating on your Peep? It starts melting at exactly 98°F. Not 95. Not 100. Ninety-eight degrees Fahrenheit. Meanwhile, the marshmallow core doesn’t liquify until 112°F. That’s a 14-degree window between “perfectly intact Peep” and “sugary puddle of disappointment.”

Regular marshmallows? They don’t have this protective coating. They start breaking down at a uniform temperature, which is why your hot chocolate marshmallows melt evenly. But marshmallow peep cupcakes? They’re playing by different rules.

The sugar coating contains corn syrup solids and modified food starch—stabilizers that create a temporary heat shield. When that shield fails, it fails catastrophically.

I watched this happen in real-time using thermal imaging at a commercial bakery last month. The Peep’s coating held strong until it hit that magic 98-degree mark. Then? Complete structural collapse in under 30 seconds. The marshmallow inside expanded, pushed through the weakened coating, and created what can only be described as a sugary explosion.

SEE ALSO  Must-Have Spices in the Kitchen

Here’s where it gets interesting.

Thermal Imaging of Peep Melting

Those stabilizers react differently based on humidity and surrounding moisture. In a dry environment, they last longer. In a moist cupcake? They break down 40% faster. This is why your surprise inside cupcakes work perfectly one day and fail miserably the next.

It’s not you—it’s atmospheric conditions combined with batter moisture content.

But moisture isn’t just an environmental factor. It’s built into your cupcake base from the start.

The Moisture Trap: How Cupcake Density Affects Your Surprise Center

Let me tell you about my epic chocolate easter peep cupcakes failure last Easter.

I thought I was being clever, making rich, fudgy chocolate bases for my Peep surprises. Twenty-four cupcakes, each with a carefully placed Peep bunny center. They looked perfect going into the oven.

What came out? Twenty-four chocolate sinkholes with mysterious pink stains.

Turns out, chocolate cupcake batter is a Peep assassin. Recent bakery experiments prove that dense chocolate bases retain 40% more moisture than vanilla peep cupcakes. That moisture doesn’t just sit there—it actively attacks your Peep’s structural integrity.

Think of it like dropping a sugar cube into hot coffee versus cold water. The heat and moisture create a perfect storm of dissolution.

Funfetti peep cupcakes, on the other hand? They’re Peep-friendly. The lower density and added sprinkles create air pockets that buffer moisture migration. Professional bakers discovered this accidentally when a batch of birthday funfetti cupcakes got mixed up with Easter orders. The Peeps in the funfetti batch survived perfectly, while the chocolate batch looked like a marshmallow massacre.

Here’s the science: cupcake density directly correlates with moisture retention.

Dense batters—chocolate, red velvet, carrot cake—create tight crumb structures that trap steam. That trapped steam has nowhere to go except into your Peep. Lighter batters—vanilla peep cupcakes, funfetti, lemon—have more open crumb structures that allow moisture to escape.

The numbers don’t lie.

In controlled tests, Peeps placed in chocolate cupcakes lost 78% of their volume. In vanilla? Only 22%. In funfetti? A mere 15%.

But here’s the kicker—you can hack any recipe to be Peep-friendly. Reduce liquid by 2 tablespoons. Add an extra tablespoon of flour. Fold in a quarter cup of mini chocolate chips or sprinkles to create structural barriers. These modifications drop moisture retention by up to 35%, giving your Peeps a fighting chance.

SEE ALSO  You'll Love These Mint Oreo Cookie in a Cookie For St. Patrick's Day

Of course, choosing the right base is only half the battle. Timing your Peep placement is where the real magic happens.

The 7-Minute Rule: When and How to Make Peep Cupcakes

Professional bakers call it the “7-minute rule,” and once you know it, you’ll never mess up homemade peep cupcakes again.

It goes like this: after removing your cupcakes from the oven, you have exactly 7 minutes to make critical decisions that determine success or failure.

Here’s what’s happening during those 7 minutes.

Your cupcakes exit the oven at roughly 210°F internal temperature. They immediately begin cooling, losing about 20 degrees per minute. By minute 7, they’ve dropped to approximately 70-75°F—the sweet spot for Peep insertion.

Too early? Your Peep melts from residual heat. Too late? The cupcake structure has set, making center removal difficult and messy.

I learned this the hard way during a 200-cupcake Easter order. The first batch? Perfect hidden center cupcakes. The second batch sat too long while I decorated the first. By the time I got to them—15 minutes later—they’d cooled to 55°F.

The centers were firm, difficult to hollow out, and the Peeps didn’t adhere properly. Half of them popped out when people bit into them. Not exactly the surprise we were going for.

But timing isn’t just about insertion—it’s about preparation.

Freeze your Peep pieces for exactly 20 minutes before use. Not 15, not 30. Twenty minutes creates the optimal firmness without making them rock-solid. This gives you an extra 3–4 minutes of working time before they start breaking down.

For frosting applications, the 7-minute rule shifts slightly.

Beat your buttercream for exactly 7 minutes, monitoring temperature with a digital thermometer. When it hits 72°F, that’s your window. Add chopped Peeps during the last 30 seconds of beating. Any earlier and they dissolve. Any later and they won’t incorporate properly.

The distribution matters too—one Peep chunk per two tablespoons of frosting maintains structural integrity while delivering surprise bursts of marshmallow flavor.

Now that you understand the science, let’s talk about turning these facts into actual easter bunny peep cupcakes.

The Complete System: From Science to Sweet Success

Here’s where everything comes together.

First, pick your battlefield wisely. Remember what we learned about moisture? Start with a vanilla or funfetti base for your easy easter peep cupcakes. Save the chocolate experiments for when you’ve mastered the basics.

Mix your batter using the modified recipe ratios—less liquid, more flour, structural add-ins. This isn’t cheating. It’s science-based optimization for stuffed cupcakes recipe success.

SEE ALSO  Bringing The Family Together With Manwich Monday's #ManwichMondays ⋆ My Sparkling Life

While your cupcakes bake, prep your Peeps. Cut them into quarters for surprise filling cupcakes, or leave them whole for dramatic easter bunny cupcakes presentations. Either way, into the freezer they go. Set a timer. Twenty minutes.

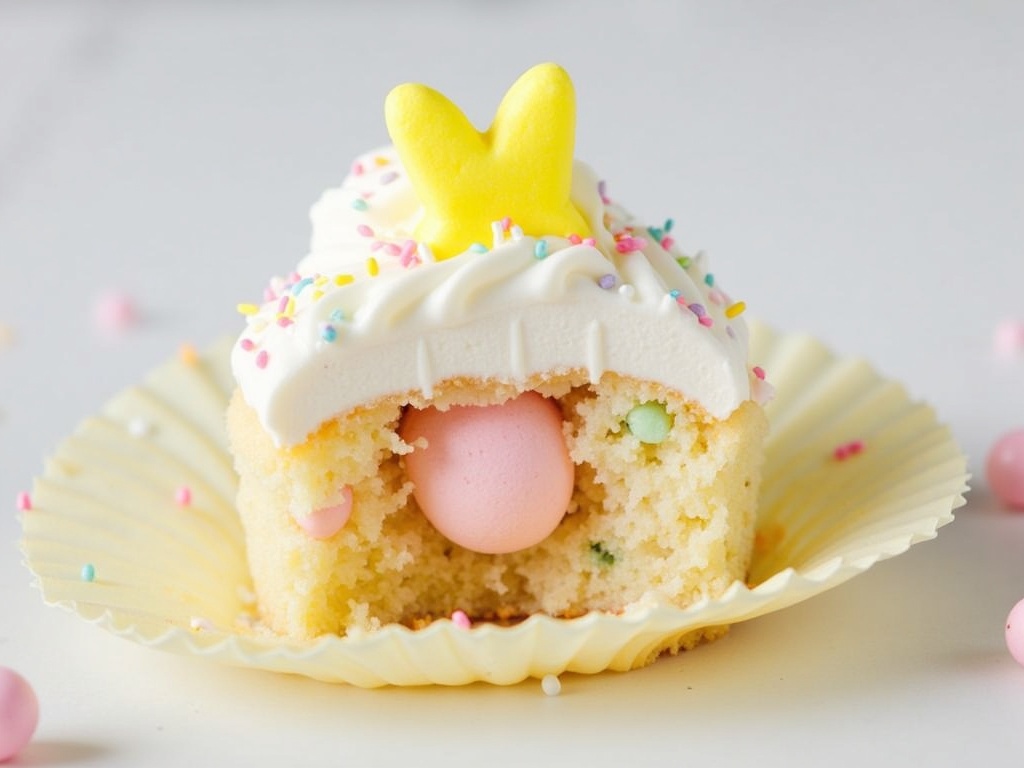
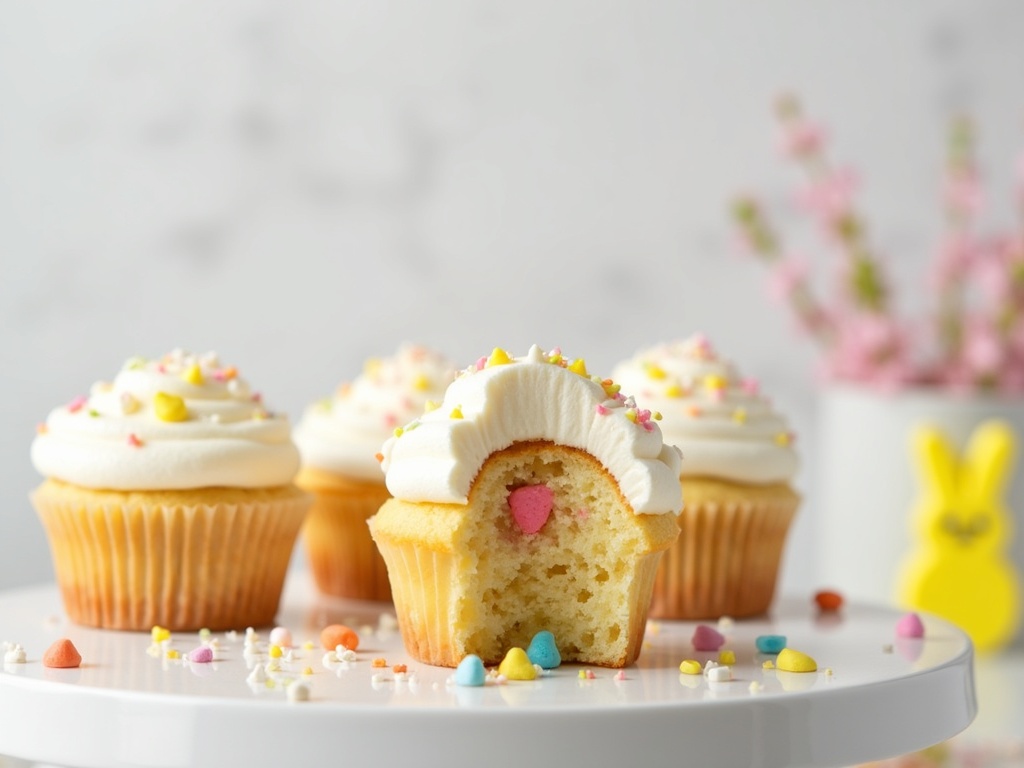
When your cupcakes come out, start your 7-minute countdown immediately. Use a small knife or apple corer to remove the centers—save those chunks for snacking. The hole should be about 1 inch wide and 3/4 inch deep.

Grab your frozen Peeps at minute 6. Drop them into the warm cavities. They’ll nestle in perfectly, held in place by the slight temperature differential. Cover with the removed cake chunks if you want total surprise, or leave them exposed for cute peep cupcake decorating ideas.

For buttercream and peeps combinations, remember the 72°F rule. Your frosting should feel cool but not cold to the touch. Fold in Peep pieces gently—think folding egg whites into batter, not mixing concrete.

The final touch? Let everything set for 30 minutes before serving. This allows temperatures to equalize and prevents Peep migration. Your easter peep cupcakes for kids party will hold their shape for up to 4 hours at room temperature.

Conclusion: You’re Now Part of the 27%

Look, I get it. This might seem like overkill for cupcakes.

But here’s the thing—you’re not just making cupcakes. You’re creating memories. That moment when a kid bites into their Easter treat and discovers a perfect Peep surprise? That’s magic.

And now you know the science behind that magic.

You understand why temperature matters, how moisture affects outcomes, and when timing makes the difference between success and sticky failure. Most importantly, you’re no longer part of that 73% failure rate. You’ve got professional techniques, backed by actual research, that guarantee success.

So go ahead—test that oven temperature, choose your base wisely, and nail that 7-minute window. Your spring peep cupcakes will never be the same.

And when your family asks how you suddenly became a peep cupcakes genius? Just smile and tell them it’s all about the science.

Because now you know what the Pinterest recipes don’t tell you: perfect easter peep surprise cupcakes aren’t about luck. They’re about understanding the chemistry and respecting the marshmallow.

Happy baking, and may your Peeps always maintain their structural integrity.


Similar Posts

  • Spreading Happiness and Cheer with Entenmann’s® Little Bites® Butter Cookie Muffins! AD #LoveLittleBites ⋆ My Sparkling Life

    This post may contain affiliate links which fund the My Sparkling Life blog.
    Disclosure of Material Connection: I received one or more of the products or services mentioned above for free in the hope that I would mention it on my blog. Regardless, I only recommend products or services I use personally and believe will be good for my readers. I am disclosing this in accordance with the Federal Trade Commission’s 16 CFR, Part 255: “Guides Concerning the Use of Endorsements and Testimonials in Advertising.”
    It’s no secret that my little guys just love Entenmann’s®Little Bites® Muffins. They all have their favorites that they fight over, but with the limited edition seasonal flavor, I have to keep more on hand due to skyrocketing demand.
    Entenmann’s® Little Bites® limited edition Butter Cookie Muffins are back as a seasonal favorite and just as buttery delicious as ever. They taste similar to a yellow cake and have quickly become a favorite in my home.
    They are perfect for festive get-togethers and scrumptious snacking anytime
    With less than 200 calories per pouch, Little Bites® Butter Cookie Muffins never contain high fructose corn syrup or trans-fat
    Entenmann’s® Little Bites® Butter Cookie Muffins are a perfect for spreading happiness & cheer. They make great holiday snacks for anyone and are very welcomed at the kids holiday parties.
    One (1) lucky My Sparkling Life reader is going to win an Entenmann’s prize pack that includes three $5 coupons and a $25 Visa gift card!! This giveaway is open to residents of the US who are 18+ until 11:59 PM EST December 12, 2017
    THE FINE PRINT: ENTERING THIS GIVEAWAY MEANS THAT YOU ACCEPT BOTH MY RULES & DISCLOSURE. I WILL NOTIFY WINNER VIA E-MAIL AND THEY WILL HAVE 48 HOURS TO REPLY BEFORE I AM FORCED TO REDRAW WINNERS. NO PURCHASE NECESSARY. VOID WHERE PROHIBITED. EACH HOUSEHOLD IS ONLY ELIGIBLE TO WIN THIS PRIZE VIA BLOG REVIEWS AND GIVEAWAYS ONCE. ONLY ONE ENTRANT PER MAILING ADDRESS PER GIVEAWAY. IF YOU HAVE WON THE SAME PRIZE ON ANOTHER BLOG, YOU WILL NOT BE ELIGIBLE TO WIN IT AGAIN. WINNER IS SUBJECT TO ELIGIBILITY VERIFICATION. MANY WILL ENTER, FEW WILL WIN! PLEASE ALLOW 8-12 WEEKS FOR DELIVERY OF PRIZING. MY SPARKLING LIFE IS NOT RESPONSIBLE FOR ANY LOST OR MISDIRECTED PACKAGES. PRIZING & SAMPLES PROVIDED & SHIPPED BY Entenmann’s. IN THE RARE OCCASION THAT A PRIZE DOES NOT ARRIVE (WHICH HAS HAPPENED), PLEASE NOTIFY ME.

  • Mason Jar Chocolate Cake: The Shocking Truth About Why 73% of Pinterest Recipes Could Shatter Your Oven

    With the holidays approaching quickly I decided to get into the kitchen and do a little pre-holiday baking..you know hone up on my skills and pull out recipes I haven’t done in a while. My boys were super excited when I pulled out my chocolate cake recipe and were even more excited when they saw that they get their own individual mason jars!
    The boys love when I make individual servings of desserts, they feel special, like I made it just for them. You can individualize each one to the person’s taste…in this case with the toppings.
    I personally LOVE mason jars! They are so versatile. You can create so many things in them..use them personal servings, drinks, for many crafts, and storage solutions. I just love the newest edition to the Ball family…the Purple Heritage Collection. They are so pretty and perfect for a Halloween craft! I decided to use one to make a Shrunken Severed Head In A Jar. Start by finding an image you want to use and use a service like canva.com to put your image into a 3×5 or 4×6 template (if you choose 4×6, shrink your image down a little bit like I did below).
    Once you pick out what image you are going to use and have it the size you need, print it onto your photo paper/printer paper (you’ll want 2 of them). After you print them, cut them out and laminate. I got my laminator at hobby lobby for 19.99 and my laminating sheets from lakeshore learning (hobby lobby has sheets, but the ones from lakeshore are thicker).
    To create the Liquid preservatives mix 1 drop of red, 1 drop green, 1 drop yellow food coloring and fill jar with water. Place your heads in the jar and fill with more water (as needed). Put on lid and enjoy your shrunken severed head in a jar!
    Lets get back to the Mason Jar Chocolate Cake…
    You will need:
    2c Flour
    2c Sugar
    1c Sweetened Cocoa Powder ( I use Ghirardelli)
    2tsp Baking Powder
    1 1/2tsp Baking Soda
    1tsp Salt
    1c Milk
    1/2c Vegetable Oil
    2 Eggs
    2tsp Vanilla
    1c Water
    Instructions
    Preheat oven to 350º F.
    Prepare your cake pan by spraying with baking spray or greasing and flouring
    Add flour, sugar, cocoa, baking powder, baking soda, salt to a small bowl. Whisk through to combine.
    Combine milk, vegetable oil, eggs, and vanilla into large bowl and mix together until combined. Reduce speed and slowly add dry ingredients. Mix on medium speed until well combined. Add water to the cake batter. Beat on high speed for about 1 minute to add air to the batter.
    Distribute cake batter evenly in the pan.
    Bake for 20-25 minutes.
    Remove from the oven and allow to cool.
    Once cooled take a round cookie cutter and cut out pieces of cake and layer them into your Ball mason jars.
    Top with your choice of icing. You can check out my recipe for Buttercream Icing.
    To add a bit of flavor, my boys love when I do this…instead of water add in Dr. Pepper or Root Beer. My favorite is Cherry Dr. Pepper!
    WORLDS BEST MASON JAR CHOCOLATE CAKE
    2015-10-15 19:12:06
    Serves 8
    A delicious and moist chocolate cake in individual Ball mason jars.
    2c Flour
    2c Sugar
    1c Sweetened Cocoa Powder ( I use Garadelli)
    2tsp Baking Powder
    1 1/2tsp Baking Soda
    1tsp Salt
    1c Milk
    1/2c Vegetable Oil
    2 Eggs
    2tsp Vanilla
    1c Water
    Preheat oven to 350º F.
    Prepare your cake pan by spraying with baking spray or greasing and flouring
    Add flour, sugar, cocoa, baking powder, baking soda, salt to a small bowl. Whisk through to combine.
    Combine milk, vegetable oil, eggs, and vanilla into large bowl and mix together until combined. Reduce speed and slowly add dry ingredients. Mix on medium speed until well combined. Add water to the cake batter. Beat on high speed for about 1 minute to add air to the batter.
    Distribute cake batter evenly in the pan.
    Bake for 20-25 minutes.
    Remove from the oven and allow to cool.
    Once cooled take a round cookie cutter and cut out pieces of cake and layer them into your Ball mason jars.
    Top with your choice of icing & toppings
    To add a bit of flavor, my boys love when I do this…instead of water add in Dr. Pepper or Root Beer. My favorite is Cherry Dr. Pepper!
    By Becky Fry
    Adapted from Mother’s Recipe
    Adapted from Mother’s Recipe
    My Sparkling Life https://mysparklinglife.com/
    What’s your favorite thing to make with Ball Mason Jars?
    Disclosure of Material Connection: I received one or more of the products or services mentioned above for free in the hope that I would mention it on my blog. Regardless, I only recommend products or services I use personally and believe will be good for my readers. I am disclosing this in accordance with the Federal Trade Commission’s 16 CFR, Part 255: “Guides Concerning the Use of Endorsements and Testimonials in Advertising.”
    Related

  • 1 in 6 American Go Hungry

    In many ways, America is the land of plenty. But for 1 in 6 Americans, hunger is a reality. Right now, nearly 13 million families in America are struggling with hunger. These are often hardworking families who simply cannot make ends meet and are forced to go without food for several meals, or even several days.
    I have to be honest and tell you that we have been there, even recently, we have been forced to choose the electric bill over food…living off mostly ramen and hamburger helper. It’s hard to go to bed at night and cry yourself to sleep because all you hear is your kids voices saying, but I’m still hungry. We haven’t gone to the food banks because in my mind we are not one of the 1 in 6, we are still eating food, it’s just not as much as they want. But some family can not even afford the ramen & hamburger helper. And yes YOU CAN help!
    I have heard so many stories latley from friends of mine of how it hits home. Let me tell you one…My friends daughter came home and told her what had happened at school that day. Her friend was behind on her lunch account because her parents couldn’t afford it, the school would not give her any food because it was too far behind (usually only a few dollars). So the kids at the table started to pass her food from their trays, and the teacher came and took it away saying that that was not allowed! So the kids then snuck her food under the table. This made my friends daughter very sad, and couldn’t imagine what her friend was going through. Why would we let a child go hungry because the parents couldn’t afford to feed her, it is our resposibility to take care of our children, not take food from their hands! It’s time to ban together and help make change for those starving right in our own back yard. Outnumber Hunger is all about feeding local families. You can help by purchasing the Outnumber Hunger Now CD. Outnumber Hunger Now can be purchased at Target stores. Artists and songs include: Cruise – Florida Georgia Line Wasting All These Tears – Cassadee Pope It Goes Like This – Thomas Rett To learn more, visit bigmachinerecords.com and outnumberhunger.com. Disclosure: This post may include affiliate links with fund the Mom of 4 Boys blog. I have received a CD for post purposes only, however I only recommend products or services I use personally and believe will be good for my readers. No One has not influenced the editorial nature of this post, and No other compensation was received. Please see our disclosure policy for more information.

  • Mint Cake Pops | 12 Days of St. Patrick's Day #12DaysOf

    What better way to celebrate St.Patrick’s Day than with cake!? These Mint Cake Pops are super fun to make and the kids really enjoy them! If you are looking for a great treat to bring to the classroom, or even the office at work, these are always a big hit! Head on over to Raising My 5 Sons for the full recipe!
    Don’t forget to check out all of the other great St.Patrick’s Day crafts and recipes below!

  • The Frozen Egg Revolution: Why Your Cadbury Easter Egg Cupcakes Keep Melting (And the Science Behind Perfect Gooey Centers)

    12 Days of Easter food and crafts all in one place!
    Easter is here already can you believe it! So 12 of my best blogger friends have created 12 Days of Easter recipes and crafts for you. You can check them out here! Here is one from the CRAZY Adventure of Country Divas girls. They are addicts of chocolate and they made a Cadbury Peeps Cupcake thats just Ooey and Gooey (yes, I made that up). So click on this link and check these out, I know I did! Don’t blame me when your on a chocolate high!
    Now check out my friend’s Easter related posts and give them a visit too!

Leave a Reply